I left school in 1957 aged 15 years with notions of being an archaeologist or naturalist, or even a film cameraman, but with not one qualification to my name. My furniture-making farther said that I had no choice but to seek a job in the local furniture industry. There has been such an industry in my home town of High Wycombe (35 miles north of London) for over 200 years so it seemed perfectly natural, although not very exciting, to follow in my father’s footsteps.
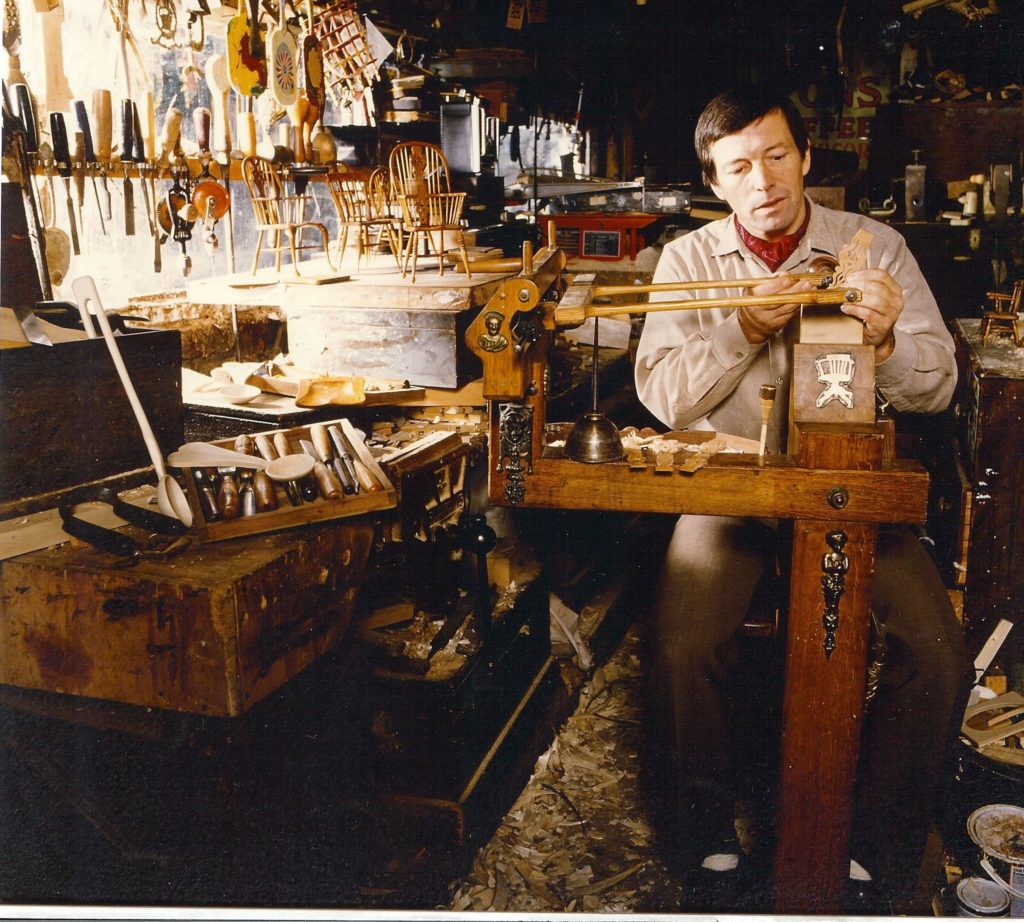
Stuart king using a marquetry cutter’s donkey to produce components for his then range of miniature Windsor chairs c1982
Working for Castle Brothers
Castle Brothers was a large concern manufacturing typical post war furniture with modernist clean lines, furniture designed with what the machine could produce rather than what a craftsman could achieve. I remember white coated men with clipboards and stop-watches taking an intense interest in the minutiae of a workman’s movements at the machine or assembly bench, and being cursed by the employee under his breath. This was a revelation to me: school didn’t seem so bad after all!
Part of the firm’s out-put was veneered cabinets and in retrospect, I was fortunate to be placed in the veneer shop. The veneers were bundled in long packets (or irregular packets if the veneers were burr, crotch or curl) of 32 sheets tied with string at each end and in sequential order just as they had been sliced on the manufacturers veneer cutting machine. It was normal practice to purchase the whole ‘log’ or ‘flitch’, in other words a whole logs worth of veneer, tied in manageable packets. Most of the veneers were obtained from London dealers, most of who both cut their own, and imported veneers. Rio Rosewood from South America was always imported ready cut giving added value to the country of origin, as was Canadian Maple and Australian Walnut.
After soaking in large vats of water to soften the logs the veneers were either ‘sliced’ or ‘peeled’ on huge machines. Sliced veneers were just that, with the log firmly secured, a super-sharp heavy-duty blade slowly converted the solid log into thousands of thin slices of veneer, the average thickness being .7mm thick. Peeling was where a log was rotated against a blade (similar to a giant pencil sharpener) producing continuous sheets of veneer that was then guillotined to width. Each method produced a different grain configuration with much of the rotary cut material going for plywood production. Veneers are a very efficient and cost effective way to utilise rare, exotic and expensive timber as a little goes a long way. Prior to the machine produced veneer, they were “sawn cut”. This was both more time consuming and wasteful of material, the veneers were cut much thicker with as much again being wasted by the saw-cut in the form of sawdust.
I never ceased to get a thrill from ‘opening up’ a packet of veneer and to see the grain of a highly figured wood ‘move’ as each single leaf was turned over one by one like individual photographic frames of a movie in slow motion, it really was like revealing the heart of the tree.
For the first few weeks in the job, I was given the boring task of trimming the edges of veneered panels, although soul destroying, it was a necessary introduction into handling a delicate material. Instruction to bench work followed, this was the creative process, ‘veneer matching’, using boxwood rulers, steel ‘straight edges’ and razor sharp hollow-ground knives hand made from worn-out commercial hacksaw blades. I soon learnt how to use veneers economically whilst at the same time to their best visual advantage. Quartering, feather matching, cross banding, inlaying boxwood lines and fancy bandings, soon I possessed enough skill to produce chess boards in my spare time. This was an early source of extra pocket money. Better luck still was being introduced to ‘knife-cut’ marquetry by a fellow employee who did this as a hobby. He showed me how to create marquetry pictures of landscapes and birds using the ‘window’ method; this was a revelation and appealed at once to my artistic instincts.
The window method is the one usually adopted by hobbyists and involves using a ‘waster’ veneer on which the design is applied; it must be of a variety that is easy to cut with a sharp pointed knife. Put simply the method is this; one by one each separate element of the design is replaced with a veneer of appropriate colour and grain. The term ‘window’ reflects each individual aperture cut out with the knife before the chosen veneer is placed underneath to be traced and cut out. It is then inserted into the waster and taped into position; this is continued until the whole waster/design is replaced with artistically chosen contrasting veneers.
Within two years Castle Brothers went bust and I found employment doing simple veneer work in a small village chair factory called Cherry Tree Chair Works. This wonderful little firm was working in the dark ages using methods that even then were virtually confined to the furniture history books. Suffice to say, this business also met its demise whilst I was there and it was time to move on once more, this time to work in a long established veneer panel company called Richard Graefe, established in High Wycombe c1847 by a German émigré.
The Marquetry Cutter’s Donkey
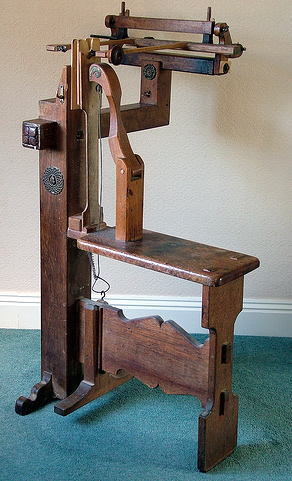
It was here that I received my first introduction to commercial marquetry, work that was produced using the ‘marquetry cutter’s donkey’. The donkey is a fantastic bit of kit! It incorporates a seat, a foot operated clamp to hold the work being cut and a horizontal fretsaw frame. It was fully developed by the 1780s and has not been improved since then. This horizontal fretsaw enables the production of multiples to be cut together, therefore making highly intricate work more cost effective, but still never really cheap.
Ken Lindsey was the first man I saw using a donkey, I took this over-the-shoulder picture about 1963. Ken always made his own blades filed at 13 teeth to the inch!
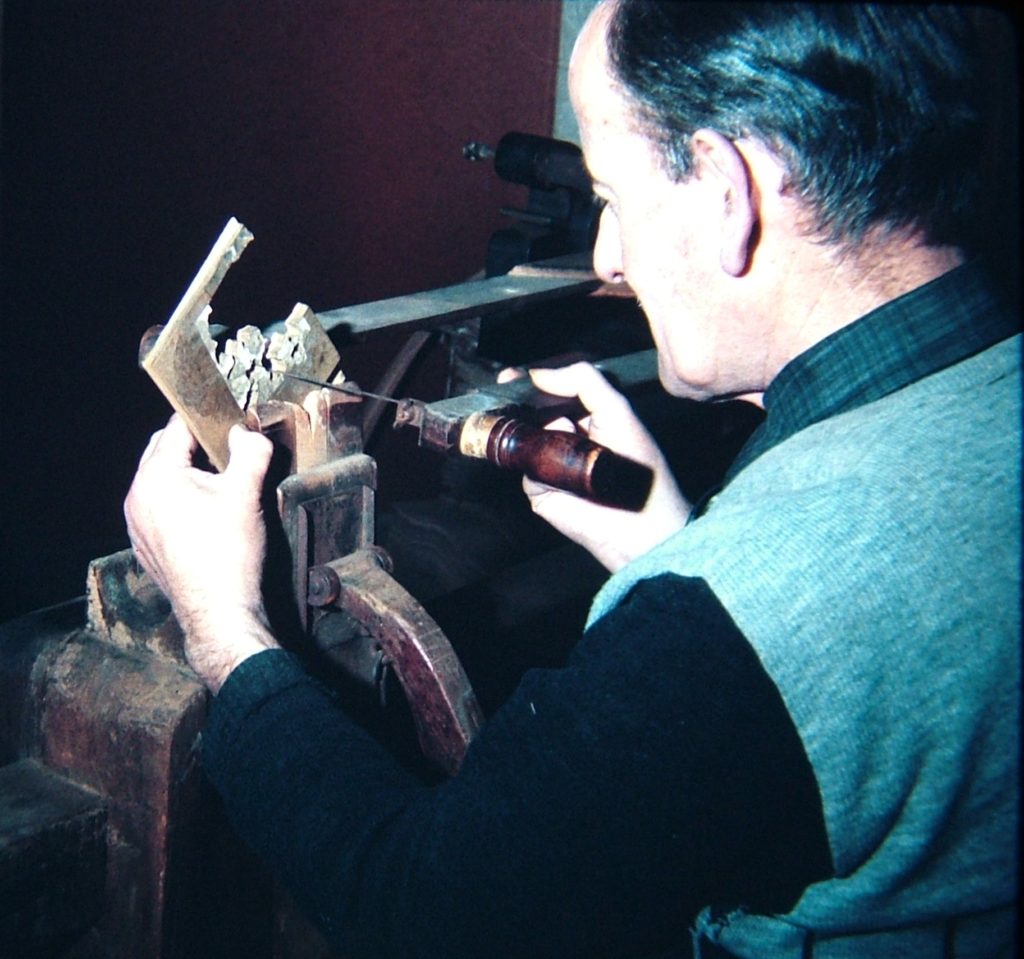
The marquetry cutter’s donkey was developed from the marquetry ‘horse’, this being the seat and clamp portion without the combined fixed arm for the saw frame. The fretsaw was held separately in the right hand with the work being secured in the clamp and rotated by the left hand. The disadvantage of this was that accurate right-angled cutting was more difficult, but not impossible, as evidenced by the work of the 19th century Sorrento craftsmen from Italy who persisted in using the marquetry ‘horse’. Today the marquetry horse and the donkey have been replaced by industrial fretsaws. This example was made by me in 1982.
In its heyday, Richard Graefe employed 24 marquetry cutters working at their respective ‘donkeys’ producing inlays for the furniture industry. Women were employed to assemble the marquetry panels and paterea. With the advent of the railways they also produced pictorial English scenes to decorate the Pullman coaches. However, the aesthetic taste of post war Britain was moving away from fussy, over ornamented design, woodcarvers were having a difficult time and there was little enthusiasm for old fashioned decoration such as marquetry, and Richard Graefe were moving with the times.
Furniture restoration and marquetry repair
Fortunately the firm retained one traditional marquetry cutter, Ken Lindsey, from whom I received some basic instruction. It was during this time that my interest in furniture history developed resulting in a sideline of restoring antique furniture and specialising in the repair of marquetry, it made sense to capitalise on these specialist skills. Furniture restoration will never be an exact science as each job is unique; marquetry probably presents more challenges than most woodworking disciplines such as, say, polishing or carving. One has to develop knowledge of timber species used at various periods and of course to be able to identify them and to understand their individual working characteristics. A ‘feel’ for the style of any given piece of furniture and the methodology of the artisan who created it are of utmost importance if new work is to blend in with the old.
‘Hand veneering’ is a technique rarely encountered today. In the 1960s Ken Lindsey instructed me in this; it can be a rather messy job of applying veneer unless great discipline is maintained. An understanding of the way veneer swells and stretches when in contact with water and the hot ‘animal’ glue (also known as Scotch, slab, pearl and ‘hoof and horn’ glue), and the movement that can take place as it dries is essential. The veneer ‘hammer’ used to squeeze out excess glue would normally be made by the user. Its use required dexterity. With the veneer hammer held in one hand whilst the other applied a warm clothes to iron to the veneer to maintain the glue in a liquid state, its efficient use came only with a lot of practice. Hand veneering was not only used for applying plain veneers but also for quartering, cross banding and the like.
My restoration work brought me into contact with my marquetry mentor, the late Andrew Oliver
Here was the ultimate craftsman, a man of great intellect: if you asked him the time he would tell you how the watch was made! Andrew had studied the history of his craft and the artifacts associated with it, the differing techniques used through the ages and the social influences that affected them. He was equally able to cut panels of William and Mary seaweed marquetry as he was with the exacting requirements of the 18th century classical designs of the Adam brothers. In ‘the old days’ a marquetry cutter would serve a five year apprenticeship under a master who would school the apprentice in the ‘art and mystery’ required for a life times career.
Andrew Oliver laying out marquetry components c1965
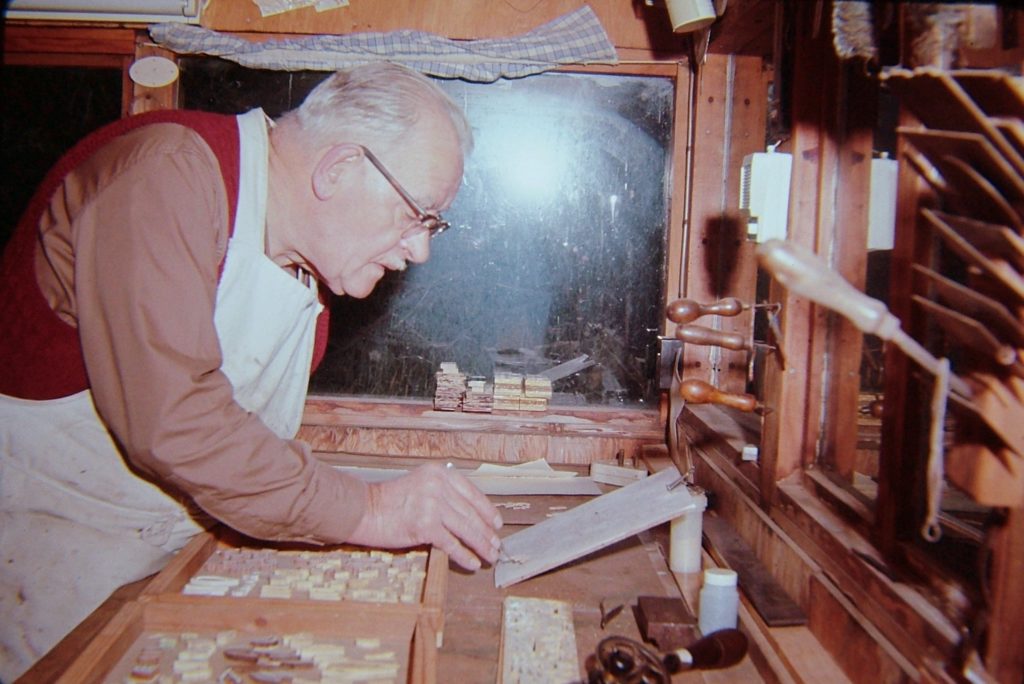
How does one apply marquetry to a curved surface? Back then, for me, it was a case of ‘ask Andrew’! Andrew (shown in the photo below laying out marquetry) would patiently explain and demonstrate different techniques to me as and when I enquired, then expand as to their development in history and where to purchase any special materials I might need etc. Little things like snipping off the pointed ends of veneer pins so that they would not spit the veneers when making-up a ‘packet’ for cutting. I remember his childish delight one day in telling me how he had worked-out the original method of ‘backing-off’ seaweed marquetry, and his keenness to share this with me. The art of ‘sand shading’, cutting brass, choice of fretsaw blades, recipes for toning new work down to match a time worn original, all this knowledge was shared with me.
Such generous mentors are seldom encountered today, I owe Andrew a great deal for his time and patience; it has stood me in good stead. It was Andrew who encouraged me to become self employed (free lance), a decision I have never regretted. Becoming unfettered from the factory floor provided me with the freedom to develop and use skills that were unavailable to me in a factory setting. Today, apart from books aimed at the hobbyist marquarian there is little in the way of instruction available to those seriously interested in following this traditional craft as a profession.
Going freelance
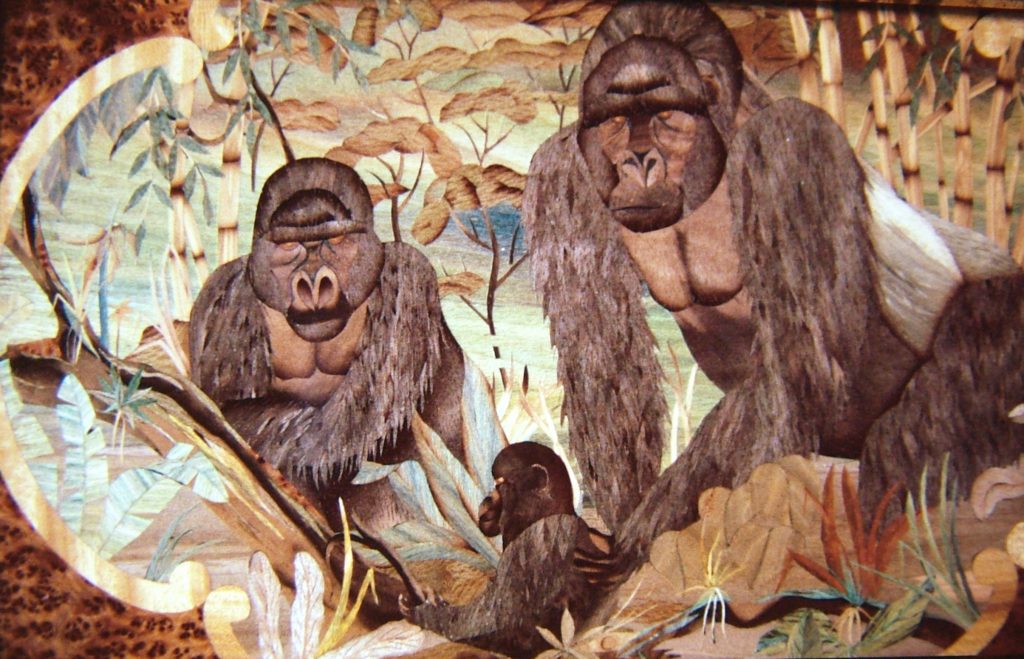
By 1974 I was sufficiently established with my part-time antique restoration work and occasional lectures coupled with demonstrating at woodworking shows /exhibitions that I packed in the day job and went freelance; the best decision of my life! Since then I have been commissioned to create many one-off pictorial marquetry panels that have been incorporated in bespoke furniture. Much of this has been produced using a combination of knife techniques and input from the marquetry donkey. These modern day clients expect the finished piece to have a photographic quality; this can only be achieved using special techniques developed for the purpose. The commission that provided me with the most pleasure was a depiction of Victoria Falls complete with a buffalo hunt and eagles soaring above the mist: that piece took me over six months to complete. Another of my commissions, a marquetry panel of gorillas, all knife work, is shown below.
Detail of a Gorilla marquetry panel. This is all knife work, by Stuart King late 1990s
More about marquetry
For examples of my marquetry as well as photos and illustrations from the history of marquetry, visit Stuart King’s Marquetry Gallery on Flickr.
